Home Blog Page 2

Eggplant Parmigiana Shakshuka

The other night, I was going through my recipes when I came across one of my favorites, Eggplant Parmigiana. I never cared much for eggplant parm until I found this unbreaded version. It does have a layer of breadcrumbs on top, and the eggplant doesn’t turn into hard, tasteless disks. Not long after, I stumbled upon this Eggplant Parmigiana Shakshuka recipe while scrolling through Pinterest. A healthier version of my beloved eggplant parm? I had to try it!

The love child of Middle Eastern shakshuka and good old Italian fat-bomb, Eggplant Parm. But healthier, obvs. PS This MUST be served with garlic bread. 😉 xx

Recipe Author: Kellie at Food to Glow
Get the recipe

The Ingredients

My first step, as always, was a search through my kitchen for ingredients. I usually find several, but this time I had very few. All I found was olive oil, salt, pepper, and honey. That left me with a good-sized shopping list, but everything was easy to find at my local grocery store. I had a shopping cart full of fresh vegetables, herbs, cheese, and eggs in no time!

Eggplant Parmigiana Shakshuka Ingredients
Eggplant, red bell pepper, red onion, fresh tomatoes, garlic, spinach, ricotta cheese, homey, oregano, olive oil, eggs, canned diced tomatoes, and parmesan cheese

The Process

Like my favorite eggplant parm recipes, this one begins with slicing and baking the eggplant. Easy enough! I sliced my eggplant into thick pieces, placed them on parchment lined-sheet pans, brushed with olive oil, and baked for 25 minutes.

Eggplant slices brushed with olive oil
Eggplant soaks up olive oil, so I only brushed it on top

Lots of eggplant recipes include salting the eggplant, but this one skipped it. Letting the sliced eggplant sit for 20-30 minutes after generously salting it draws out any bitterness (it is rinsed and patted dry afterward). I have heard people say it’s unnecessary, and I have also heard it’s only needed for mature eggplant. While I was tempted to add it to this recipe, I decided to trust the process.

I prepped the remaining ingredients while the eggplant slices baked. There wasn’t anything difficult involved, just basic cooking skills. It was a lot of peeling, chopping, and measuring, and I finished it just before the eggplant timer went off.

Prepped Eggplant Parmigiana Shakshuka ingredients
I prepped the remaining ingredients while the eggplant was baking

Making the Tomato Sauce

Now it was time to get out my enameled cast-iron braiser and make the sauce. This step was done over low heat, so preheating was important. I added the leftover olive oil, set the stove to four, and set a timer for four minutes to make sure the pan was hot enough when I added the ingredients.

Step three covered cooking the sauce, and it was a simple process. The times listed were accurate, but there wasn’t one for softening the red bell pepper. I had to guess at that and they seemed to be softening around the six-minute mark.

After simmering for another 15 minutes, I transferred the sauce ingredients into my blender, added the balsamic vinegar, and pulsed a few times to blend. I’m glad I didn’t skip the taste test because it needed salt, pepper, and a drizzle of honey to balance it out. I didn’t measure, but I think I used 1-2 teaspoons of honey.

Tip: Pouring a hot, heavy pan into a blender was awkward and messy. I used a ladle to safely transfer the sauce ingredients from the pan to the blender.

Parchment paper under the eggplant slices made clean-up easy

Finishing My Eggplant Parmigiana Shakshuka

The eggplant had plenty of time to cool while I made the sauce, so cutting it into smaller pieces was fairly easy. Cooked eggplant can be delicate, especially the larger pieces with lots of seeds. The peel was the only thing holding them together.

Tip: I noticed the eggplant turning into mush when I moved it onto my cutting board first. Cutting up the eggplant on the sheet pans and transferring it directly to the stove gave me bigger chunks of eggplant.

Next, I added the eggplant to the pan, along with the optional spinach, sauce, and ricotta cheese. I stepped away to break the eggs into small bowls while I waited for the pan to begin bubbling. Once it did, I added the shredded parmesan with the eggs and covered the pan for six minutes to poach the eggs.

Cracked eggs in prep bowls
I cracked the eggs into small bowls before adding them to the skillet

This step was several sentences long, and I almost missed adding the shredded parmesan! I added it after the eggplant, spinach, sauce, and ricotta mixture was bubbling, just before the eggs. I also think I over-mixed the ricotta, but I doubt it affected the taste.

Timing

This recipe didn’t list prep, cooking, or total time, so I’m using the times in the instructions for the time rating. I still kept track of my time, and this is how it was spent:

  • 5 minutes to prep the eggplant
  • 25 minutes to bake the eggplant
    • 20 minutes for remaining prep work
  • 5 minutes to cup up the eggplant
  • 43 minutes to cook
  • 1 hour 18 minutes total

Middle Eastern Tahini, Date, and Cardamom Bulgur Wheat Breakfast Bake

I have been on a breakfast recipe kick ever since I found a sale on raspberries. The raspberries were great, but I have decided to keep going with breakfast recipes that don’t involve them. The first is this Middle Eastern Tahini, Date, and Cardamom Bulgur Wheat Breakfast Bake. I loved the story about this recipe, and it sounded so good. What really got my attention was that it uses bulgur wheat. I have found a couple of bulgur wheat recipes here, but neither is for breakfast. Bulgur for breakfast with dates, honey, and all the other ingredients sounds like something I would enjoy, so let’s give this Middle Eastern Breakfast Bake a try!

This casserole is kind-of like bread pudding and kind-of like baked oatmeal. It’s custardy, which makes it really comforting and indulgent-feeling. An exotic blend of Middle Eastern spices with a special emphasis on cardamom perfectly seasons the dish, and a garnish of pistachios and honey perfectly accentuates it.

Recipe Author: Faith at An Edible Mosaic
Get the recipe

The Ingredients

I regularly make tabbouleh and a chicken dish with coarse bulgur so it’s always in my pantry. My pre-shopping look-see turned up a few more ingredients. Coconut palm sugar, tahini, sea salt, ground cardamom, water, vanilla extract, and honey were also in my pantry.

That left me to shop for a few things, but I found most of them at my usual grocery store. They had milk, eggs, and dates, but no raw pistachios. All the pistachios they stocked were roasted with or without salt. I had to turn to the internet to get raw shelled pistachios.

Middle Eastern Tahini, Date, and Cardamom Bulgur Wheat Breakfast Bake Ingredients
Milk, coarse bulgur wheat, raw pistachios, eggs, Lebanese 7 Spice Blend (Sabaa Baharat), vanilla extract, coconut palm sugar, sea salt, ground cardamom, tahini, honey, and pitted dates

The final ingredient was the Middle Eastern Cake Spice Mix. The recipe is only available in the author’s cookbook, which I don’t have. She does include a substitute mix in the recipe’s notes, but she also says it isn’t quite the same.

I was prepared to use the substitute spice mix, but I found something better the night before I wanted to make this recipe. It’s called Lebanese 7 Spice Blend (Sabaa Baharat), and I had all of the ingredients on hand. Some of the spices (like black pepper and cumin seeds) sound like they are best with savory dishes, but trust me this mix works beautifully in this Middle Eastern Breakfast Bake.

The Process

This isn’t a complicated recipe, and it was easy to make. It began with adding the bulgur, spices, palm sugar, tahini, and milk to a 2-quart pan and stirring it constantly while it heated over medium heat. It took about 15 minutes for the cold milk to come to a simmer.

Once I saw a few bubbles, I kept stirring for an additional five minutes. After that, I removed the pan from the stove, covered it with a lid, and let it sit for 10 minutes. I was able to grease an 8'x8' baking dish with tahini and prep the water, eggs, vanilla, and dates while the pan rested.

This recipe doesn’t require an 8″x8″ baking pan, so you can use whatever you have on hand. It will need to hold at least 8 cups (2 quarts / 64 ounces / 1.9 liters). My pan was that size and this recipe filled out to the top.

Step 1: Adding the spices, bulgur, palm sugar, and tahini, and milk to a saucepan
Step 1: Adding the spices, bulgur, palm sugar, tahini, and milk to a saucepan

Once the net few ingredients were mixed in, I added them to the prepared pan, covered it with foil, and refrigerated it overnight. I intended to bake the casserole the next day, but it ended up sitting in my refrigerator for two days. Thankfully, this recipe says it can be refrigerated for up to three days before baking.

Baking this recipe was the easiest part! I preheated the oven and added the pan right out of the refrigerator. There was no need to let it come up to room temperature. I had a warmed Middle Eastern Breakfast Bake 45 minutes later, and all I had to do to finish it was add some chopped pistachios and honey on top.

Step 3: Simmered bulgur mixture added to an 8"x8" baking pan greased with tahini
Step 3: Simmered bulgur mixture added to an 8″x8″ baking pan greased with tahini

Timing

This recipe listed 20 minutes to prep, 45 minutes to cook, and a title time of 1 hour 5 minutes. Here’s how my time was spent:

  • 4 minutes to prep Step 1
  • 22 minutes to cook
  • 10 minutes to rest
    • 6 minutes to prep Step 2 (done during rest)
  • 1 minutes to mix in Step 2 ingredients
  • 1 minute to pour into baking dish
  • 45 minutes to bake
  • 1 hour 23 minutes minutes total*

*Time for refrigeration (12 hours to 3 days) is not included.

Things went smoothly, but I managed to take longer than the time listed. I have a feeling it was in Step one since it took a long time for the bulgur mixture to come to a simmer over medium heat.

Healthy Raspberry Chia Pudding

0

All good things come to an end, and that includes that big batch of raspberries I found on sale. But it’s not all bad because I finally get to try making and eating chia pudding with this Healthy Raspberry Chia Pudding! I have had chia seeds in smoothies and as toppings on smoothie bowls, but I barely notice them. They have a little crunch just like poppy seeds but no noticeable flavor. I know they will expand and soften when left in water for a long time, but will they also have any flavor? I’m about to find out!

Gorgeous, healthy and delicious chia seed pudding with fresh raspberries, milk, vanilla and honey. A perfect grab & go breakfast!

Recipe Author: Hari Chandana Ponnaluri at Blend with Spices
Get the recipe

The Ingredients

This Healthy Raspberry Chia Pudding recipe only has five ingredients, and I had all of them on hand! That rarely happens, and I always love not needing to make any trips for ingredients. It also gives me instant gratification when I find a recipe and can make it immediately.

As I mentioned, I had fresh raspberries on hand, and I also had chia seeds. I have kept them in my pantry ever since I first tried them way back in September 2020 when I bought them to make a Chocolate Overnight Oatmeal Smoothie. I like to add them to smoothies whether they are called for or not because they have so many health benefits.

Tip: Chia seeds can last two to four years if stored properly. Humidity is the natural enemy of the chia seed, so keep them in an airtight container and store them in a cool, dark, and dry place. Spoiled chia seeds become slimy, sticky, and clump together. Also, good quality chia seeds are white or black speckled, but never brown. Brown chia seeds are immature and have a bitter taste.

Milk, honey, and vanilla essence round out the ingredient list. I had to look up vanilla essence since I had never heard of it, and it’s similar to vanilla extract. There was conflicting information, but most of the information I found said they are similar and sometimes can be used interchangeably.

I will warn you, there was a lot of conflicting information out there, and I think I was more confused than when I started. I went with vanilla paste for this recipe and called it a day.

Healthy Raspberry Chia Pudding Ingredients
Chia seeds, milk, vanilla paste, fresh raspberries, and honey

Vanilla Essence vs. Vanilla Extract

Vanilla extract is made by soaking vanilla beans in alcohol while vanilla essence is flavored with synthetic vanillin. Vanillin is the tiny black seeds that give vanilla beans their signature flavor. It can be synthesized in a lab, but it doesn’t quite taste like the real thing. After all, a vanilla bean is more than just vanillin. The species, weather, soil, and many other factors contribute to natural vanilla’s flavor.

Vanilla extract is the favorite as far as flavor, of course, but vanilla essence can sometimes be substituted with little effect on the flavor. The general rule seemed to be vanilla essence can be used in items that are baked or cooked over high heat, and vanilla extract in uncooked or low-heat cooking. Vanilla essence is a popular choice for white and light-colored baked goods and frosting because it’s clear and doesn’t affect the color like dark brown vanilla extract can.

The Process

This Healthy Raspberry Chia Pudding recipe was only a few steps so it was very easy to follow. Once I had rinsed the raspberries, I added them to my blender. Next, I added The milk, honey, and vanilla paste and blended until smooth.

Blended Raspberries, almond milk, vanilla paste, and honey
Raspberries, almond milk, vanilla paste, and honey after blending

The raspberry was poured into a small mixing bowl once the mixture was smooth. All that needed to be done was to add the chia seeds and mix them in. I chose a soft silicone spatula to do the job.

Chia seeds added to the raspberry mixture

The chia seeds floated on top of the raspberry mixture even after thorough mixing. They also stuck to my spatula, but it wasn’t a lot when compared with what was left in the bowl.

The fact that the seeds floated on top of the liquid gave me a slight worry. Would they get enough moisture to expand? I had to trust the process, so I covered the bowl, placed it into my refrigerator, and left it overnight.

Chia seeds stirred into raspberry mixture

I had chia pudding when I checked on it the next morning and found the chia seeds had expanded and greatly increased the overall volume. I should have taken a photo or measured it, but I completely forgot!

Unfortunately, the newly made chia pudding wasn’t as pink as the raspberry mixture had been the day before (or the recipe photos). The black chia seeds gave the raspberry mixture a greyish tint.

All that was left to do was serve the Healthy Raspberry Chia Pudding. I divided it between small dessert dishes and garnished them with leftover fresh raspberries.

Timing

This recipe listed 5 minutes to prep/total time. It took me four minutes to mix, cover, and place into my refrigerator. The next day, dividing the pudding amongst serving dishes and garnishing them took another two minutes.

Raspberry Peanut Butter Oat Parfait

My mission to use up all the raspberries I got on sale continues with this Raspberry Peanut Butter Oat Parfait. It seems like all the recipes I found for those raspberries were for breakfast (or brunch). That wasn’t planned, but I’m not mad at it. Quick and easy breakfast recipes are always welcome around here! This one includes the raspberries I just mentioned plus overnight oats to make a grab-and-go recipe. I love those because they’re even easier than smoothies!

A breakfast parfait made by layering cold overnight oats and a simple raspberry compote. Makes enough for one meal-sized serving or two snack servings.

Recipe Author: Hannah at The Plant-Based Wok
Get the recipe

The Ingredients

Like many of the other raspberry recipes I have posted recently, this one is vegan. It is also a little flexible and gives you options for the type of milk and nut butter. I had unsweetened vanilla almond milk and peanut butter, so I used them.

I also had all of the other ingredients on hand. That was unusual because I don’t buy orange juice often, but I had just opened a bottle. The rest of the ingredients were things I usually keep in the house like rolled oats, chia seeds, and maple syrup.

Raspberry Peanut Butter Oat Parfait Ingredients
Rolled oats, almond milk, fresh raspberries, peanut butter, maple syrup, orange juice, and chia seeds

The Process

I began making my Raspberry Peanut Butter Oat Parfait by mixing all the overnight oat ingredients. No cooking was involved in this part—I just mixed up everything, covered it, and refrigerated it. The oats needed five hours to overnight so they could soften, and I chose overnight.

The raspberry compote was next and involved a little cooking. I added all the raspberries and orange juice to a 1-quart saucepan, brought them to a boil, then lowered the heat to simmer for 10 minutes. The mixture had noticeably thickened by that time. Next, I mixed in the chia seeds and placed the compete in a covered dish to cool with the overnight oats.

<yoastmark class=

Making the parfaits the next day was so easy! The photos show them with one layer of raspberries, but I added two. I had just enough of each to fill two of my 8.5-ounce Irish coffee mugs just to the top.

I garnished my Raspberry Peanut Butter Oat Parfaits with fresh raspberries. The blog photos also have nut butter, chocolate chunks, and hemp seeds on top (maybe some granola too). I didn’t notice that until I sat down to write this up.

I also noticed the blog photos look creamier than my parfaits, and the chia seeds aren’t as noticeable. the creamier version looks more appetizing, so I will make some adjustments next time I make this recipe. I’m going to try using less oats or more almond milk, and more orange juice or less simmering time for the compote. I’ll be sure to update this post with the results!

Raspberry Peanut Butter Oat Parfaits with two layers of raspberry compote

Timing

This recipe listed a total time of 15 minutes. Here’s how my time was spent:

  • 15 minutes to make the oats and compote (refrigerated overnight)
  • 3 minutes to make and garnish two parfaits
  • 18 minutes total

I fussed over the raspberry compote, so I’m sure that was what caused me to go a little over the time listed. That’s not unusual for my first time making a recipe, and I’m sure it will be quicker the next time.

Banana Raspberry Smoothie

I had plenty of raspberries left after the Raspberry Orange Smoothie Bowl I tried last week. That means another raspberry recipe, but this time I’m trying a regular drinkable smoothie. This one had such beautiful photos, and I have never tried making an ombre smoothie. Or an ombre anything, for that matter. It looks like a simple recipe, but I’m so excited to see how if I can pull off the ombre effect. Wish me luck!

If you’re looking for a smoothie that is balanced enough to have for breakfast but also hits the spot taste-wise, then look no further than my Raspberry Banana Smoothie Recipe.

Recipe Author: Sarah Bell at Our Nourishing Table
Get the recipe

The Ingredients

Like I said, I had plenty of raspberries left over from my last recipe thanks to finding them on sale. I also happened to pick up some vanilla almond milk and bananas on the same shopping trip.

A quick search through my pantry and I found the almond butter, hemp seeds, rolled oats, and even the vanilla protein powder. I had everything I needed to make this Banana Raspberry Smoothie recipe!

Banana Raspberry Smoothie Ingredients
Raspberries, almond milk, vanilla protein powder, rolled oats, hemp hearts, almond butter, and bananas

The Process

I began this recipe with fresh fruit, so I had a little extra prep work to do. No biggie, though. The banana had to be peeled and cut up, and the raspberries needed to be measured. Then I bagged them up and froze them overnight.

Tip: Cut the bananas into quarters before freezing. It makes measuring them for smoothies easy. Four pieces for recipes with one banana, two pieces for recipes that call for half a banana, etc.

Measured raspberries and peeled and chopped banana
Peeled and chopped bananas and measured raspberries before freezing

I tried this Banana Raspberry Smoothie recipe for lunch the next day. It began with making the light-colored banana smoothie base. Most of the ingredients made up the base along with half of the almond milk.

The next step read, “Divide half of the smoothie mixture between two glasses and return blender to motor”. I misunderstood and divided it evenly between the glasses so none was left in the blender. Then I proceeded to add the raspberries and remaining almond milk to blend up the pink half.

Banana smoothie ingredients in a blenderq
Adding the ingredients for the banana smoothie

Step three begins with “To the remaining banana smoothie mixture…”, and that should have clued me in. Unfortunately, I didn’t catch it until I sat down to write about my experience. I just thought my smoothie just happened to have a brighter pink color, but that wasn’t it.

What I should have done was add 1/4 of the banana mixture to each glass and then return the blender to the motor/base with half still in the pitcher. That would have given me a lighter pink smoothie like the one in the recipe’s photo.

Despite that mistake, I was now ready to try the ombre. I gave it a stir using the handle of a spoon, and I quickly had a beautiful swirl. It sort of had an ombre effect, but not quite. Even so, I was happy with the beautiful effect, and my Banana Raspberry Smoothies were very tasty!

Timing

This recipe listed a total time of 10 minutes. Here’s how my time was spent:

  • 4 minutes to make the banana smoothie
  • 1 minutes to make the raspberry smoothie
  • 2 minutes to swirl/ombre the smoothies
  • 7 minutes total

Raspberry Orange Smoothie Bowl

0

I love berries in general, but my favorite type is raspberries. They’re so sweet with a little bit of tartness, and I just adore them. I found a sale on raspberries during my last shopping trip, and I spent the next few days in my kitchen trying new raspberry recipes. One of those was this bright and cheery Raspberry Orange Smoothie Bowl. I have been drinking smoothies for breakfast for ages, but I only just made my first smoothie bowl a few months ago. That sale on raspberries was a great excuse to try another smoothie bowl recipe!

This raspberry orange smoothie bowl is a healthy, fruity, refreshing breakfast to start your morning off right! It’s packed with bright, tangy flavors from nutritious ingredients like oranges, raspberries, bananas, and orange zest. It’s plant-based, vegan, dairy-free, immune-boosting, and loaded with vitamin C. Add toppings and enjoy it with a spoon!

Recipe Author: Kaylie Grace at Purely Katie
Get the recipe

The Ingredients

It’s funny, but I didn’t look up which recipes to use my raspberries on until after I got home from my shopping trip. Boy, did I get lucky—I had nearly all the ingredients I needed!

I had picked up some bananas and unsweetened vanilla almond milk while I was out. I also had maple syrup and shredded coconut on hand.

The final ingredient was a frozen orange, and I had that too. I used cara cara oranges left over from the Sake Sangria I recently made. They look like navel oranges but are pinkish-red inside and have a sweeter flavor.

Raspberry Orange Smoothie Bowl Ingredients
Bananas, cara cara orange, unsweetened almond milk, raspberries, and maple syrup

The Process

Smoothie bowls are known for being quick and easy to make, and this one was exactly that. I did have to freeze the fruit first, though, since I had bought fresh. It’s not exactly difficult, but it does take some time to freeze solid.

Bananas: Always peel them first! They can’t be peeled after freezing. I always quarter my bananas before freezing them to make measuring easy. Most smoothie recipes need a whole banana, so I grab four pieces for them. If it’s half a banana, then I grab two pieces.

Orange: Use a knife to peel an orange (or any citrus) fast. Cut off each end, set the orange on a cutting board, and use a knife to remove the peel in strips. Cutting the peeled orange in half makes sectioning very easy.

Raspberries: All I had to do was measure and freeze since they are so small.

Fresh raspberries, bananas, and cara cara oranges
The oranges were easy to section once they were peeled and halved

The last step was bagging my measured ingredients and placing them into my freezer overnight.

Tip: Keep the bags as flat as possible to keep the contents from clumping into one giant frozen blob that won’t fit into the blender.

Frozen bananas, raspberries, and sectioned cara cara orange

The Next Day

Ideally, I would have added the frozen fruit and almond milk to my blender, pushed a button, and had a thick smoothie. the first part was quick, but the blending part didn’t go quite as smoothly.

I tried blending on high and pulsing, but it looked like only the bottom portion was being blended. The fruit on the top had been chopped into fine bits, but it wasn’t turning into a smoothie because it couldn’t reach the almond milk.

To fix my problem, I grabbed a silicone spatula, scraped down the sides, and basically mashed the ground-up fruit together. And it still didn’t mix! I repeated a few times before I realized I had packed the frozen fruit into a big, cold block.

The fix was to remove the pitcher from the base, hold a hand over the lid for safety, and give it a good shake to loosen up the contents. It did the trick, and I saw where I went wrong as I watched the blender work. I swear, my brain still thinks I have an old-fashioned blender with the blades on the bottom.

Frozen fruit and almond milk in the blender

I upgraded my blender a few years ago, and this one has more effective blades configured in a column. They mixed similarly to my old blender by starting at the bottom since that’s where the liquid was. However, if I had waited longer I would have seen the blades pull the fruit on top down into the mixed portion at the bottom. Doh!

I sampled the smoothie and decided to blend in the optional maple syrup before serving. The mixture was thick, about as thick as soft-serve ice cream. I needed a spatula to scrape it out of the pitcher because it wouldn’t pour into the bowl.

Timing

This recipe listed 5 minutes total to make it. Mine wasn’t quite as quick because I didn’t let the blender do its thing. Here’s how my time was spent:

  • 7 minutes to peel and chop fruit to be frozen overnight
  • 7 minutes to blend*
  • 3 minutes to top
  • 17 minutes total

*I’m only including time to blend everything together for the time rating since that’s what is described in the instructions. It doesn’t mention freezing fresh fruit first, and I could have bought it. Also, toppings can vary widely and so can the time it takes to add them.

Tex-Mex Migas Breakfast Tacos

A few years ago I took a vacation trip to Dallas with an old friend. There was shopping, restaurants, and museum visits galore, and it was so much fun! I got to try lots of good food on that trip, and one of my favorites was migas. There are many versions of this dish, and the version of migas I tried was made of eggs scrambled with crushed tortilla chips, topped with melted cheese and salsa. Delish! This Tex-Mex Migas Breakfast Tacos recipe reminded me of that fun vacation, and I had to give it a try. I’ve never made migas or breakfast tacos, so this should be fun!

Migas Breakfast Tacos are a Tex-Mex favorite! Cheesy soft-scrambled eggs loaded with broken tortilla chips, flavored with onions and peppers! Serve with salsa for a fantastic breakfast!

Recipe Author: Marzia at The Little Spice Jar
Get the recipe

The Ingredients

As I read through this recipe, I began planning for toppings. Cheese, onions, jalapenos, and cilantro are scrambled with the eggs/migas, so I didn’t need to add more. Salsa, hot sauce, and maybe sour cream came to mind. I would have added some guacamole, but the recipe suggested sliced avocados.

I have to admit I was torn between three types of salsa. My choices were buying a jar or making it myself. I have a go-to blender salsa recipe, but I chose the author’s recipe because I love trying new things. It was linked in the ingredients section along with another interesting option: pickled onions.

I’ve never heard of pickled onions but I was intrigued! The recipe was super simple, so I decided to make it as well. Besides, I had everything I needed for it except the onion. I had to buy most of the ingredients for the salsa and breakfast tacos, but everything was easy to find at my regular grocery store.

Tex-Mex Migas Breakfast Tacos Ingredients
Eggs, shredded Mexican cheese blend, salsa, sugar, white pepper, pickled onions, tortilla chips, vegetable oil, avocado, yellow onion, cilantro, serrano peppers, and flour tortillas

The Process

The day before I intended to make the tacos, I made the blender salsa and pickled onions. Both recipes were easy to make.

5-Minutes Restaurant-Style Blender Salsa

The salsa took me 8 minutes to make. There was a little bit of chopping and a few cans to open. Once everything was prepped and in my food processor, I pulsed it until blended but was still chunky. There were a few sprigs of cilantro left on top that didn’t get blended in and had to be tossed, but everything else went according to the recipe.

The recipe says the salsa can be served after sitting for 10 to 30 minutes so the flavors could meld, but I refrigerated it overnight with the pickled onions. It was good the day I made it and even better the next day!

5-Minute Restaurant-Style Blender Salsa
The 5-Minute Restaurant-Style Blender Salsa had a few cilantro sprigs that didn’t blend in and had to be discarded

Easy Quick-Pickled Onions

Next was the recipe for pickled onions. As promised, it was super easy to do. It took me 10 minutes to make, and I used a 32-ounce jar per the linked products at the end of the recipe. The only hiccup with this recipe was not enough liquid to cover the onions in the jar. I had to make a second batch and it took another eight minutes.

The second batch of pickling liquid covered the onions, and I left the jar on my counter for an hour to cool down before putting it in the fridge overnight. The result was beautiful brightly colored pickled onions with a little crunch. And they were addictively good!

Easy Quick-Pickled Onions
The Easy Quick-Pickled Onions were brightly colored and had a little crunch

Tex-Mex Migas Breakfast Tacos

I was really psyched to make this recipe after I sampled the salsa and pickled onions! Cooking eggs moves fast, so I decided to prep everything before I began cooking. I had it all ready to go in 10 minutes.

I used my 12-inch nonstick skillet to cook the eggs and preheated the oil for two minutes on 4. Eggs can burn easily, and they get rubbery when cooked too fast. Low is the way to go with eggs.

Beaten eggs with prepped ingredients
I used white pepper in the eggs so it wouldn’t show up like black pepper would have

Cooking begins with sauteeing the onions and peppers, then adding the beaten eggs. Once the eggs were halfway set (still runny on top), I sprinkled in the crushed tortilla chips, cheese, and cilantro and turned off the heat.

I loved the tip about adding the lid to melt the cheese, but it took a while. By the time it had, the bottoms of the eggs were lightly browned, and the chips had lost most of their crunch. I don’t think it affected the flavor, but I missed the crunch. Next time I will try adding the cheese earlier and allowing it to melt before adding the chips and cilantro.

While the cheese was melting, I sliced the avocado and sprinkled lime juice over the slices to keep them from browning too fast. Brown avocado isn’t very appetizing.

I also microwaved the tortillas for 15 seconds. Don’t skip this step! Warm tortillas are more pliable and taste better. I picked up a set of taco holders and a tortilla warmer just for this recipe. Let me tell you, it was a game-changer! The tacos were so easy to assemble, and the extra tortillas stayed nice and warm.

Tex-Mex Migas Breakfast Tacos in taco holder
Taco holders made assembling my Tex-Mex Migas Breakfast Tacos quick and easy

Timing

This recipe listed 10 minutes to prep, 10 minutes to cook, and a title time of 20 minutes. I spent my time as follows:

  • 10 minutes to prep
  • 11 minutes to cook
  • 3 minutes to assemble 3 tacos
  • 24 minutes total

My time wasn’t too far over the time listed. I think the assembly was counted as part of the prep work, and that’s where I went over. I’m not mad about it, though, because the tacos (and salsa and pickled onions) were excellent!

The above doesn’t include time to make the pickled onions or salsa. I’m not counting them in my time rating for the tacos, but my prep times are below.

5-Minute Restaurant-Style Blender Salsa:

  • 8 minutes to prep
  • 1 minute to blend
  • 9 minutes total

Easy Quick-Pickled Onions:

  • 8 minutes to make and cool pickling liquid
  • 2 minutes to slice onion and add to the jar
  • 7 minutes to make a second batch of pickling liquid to fully submerge the onions
  • 17 minutes total

Garlic Noodles

We love pasta around here, and it doesn’t have to be fancy. I love it with just a little lemon and really good extra virgin olive oil. If I have the time, I’ll add roasted garlic to the mix with this Lemon Garlic Pasta recipe. That’s why I was so eager to try this recipe for Garlic Noodles. The name doesn’t do it justice! It combines roasted garlic from my favorite recipe with black garlic, sesame oil, and salty-savory sauce. It sounds so yummy, and I can’t wait to try it!

Garlic noodles with double the garlic! Made with oven roasted garlic & black garlic (for it’s umami-ness), these noodles are packed with garlicky flavor & a must try for every garlic lover out there!

Recipe Author: Joyce Lee at Pups with Chopsticks
Get the recipe

The Ingredients

I already had the black garlic left over from the Pork Ribs with Black Garlic Miso Glaze I made last week. That saved me some time since it’s not something I could find locally. I had a few other things on hand like soy sauce, olive oil, toasted sesame oil, and butter. That left me looking for oyster sauce and spaghettini.

Oyster sauce is available at my usual grocery store, so I wasn’t worried about that. The spaghettini would probably require a trip to the local Italian grocery store since they have a huge selection of specialty pasta. And it’s not like I need an excuse to go there—it’s a foodie wonderland!

I had never heard of spaghettini, but I realized I already had it when I looked it up. Mine was labeled “thin spaghetti”, but that’s exactly spaghettini is. It’s thicker than angel hair or capellini but thinner than spaghetti. That left me one ingredient to shop for: oyster sauce. Easy!

Garlic Noodles Ingredients
Spaghettini, butter, olive oil, garlic, black garlic, soy sauce, toasted sesame oil, and oyster sauce

The Process

Making this recipe wasn’t difficult, but it did take some time. Roasting the garlic was the culprit, but most of that time was inactive. The prep work was super simple.

Roasting the Garlic

To roast the garlic, I began but cutting off the bottom of each bulb. I made sure to cut into the cloves so they would be easy to squeeze out once the garlic had cooled. Surprisingly, the peel I cut away stayed intact, and I discarded the ends of the cloves.

Roasting garlic in a ramekin
The tips of the garlic cloves came loose, but I was able to cover the cut end with the remaining peel

The recipe says to roast the garlic in foil, but I chose my tried and true method of a ramekin with a foil cover. I generously drizzled each in olive oil, added a touch of salt, and covered the dishes tightly before adding them to a sheet pan and roasting.

The garlic cloves I bought were huge, so I left them in the oven for the full 40 minutes. They came out nice and soft, which is exactly what I wanted. I roasted the garlic well before I was ready to make the noodles so I had time to let it cool.

To do that, I broke open the top of the foil with a knife and removed the garlic to a cutting board to cool. I saved both ramekins since each had extra garlic oil left in them.

Roasted garlic cloves in foil-covered ramekins
The garlic was roasted perfectly after 40 minutes in the oven

Boiling the Noodles

I made the noodles while I let the garlic roast. I had put a salted pot of water on to boil when I began the garlic, and it was ready by the time I had the garlic in the oven. Then all I had to do was boil the noodles for 5 minutes, strain them, and run cool water over them. They were ready well before the garlic finished, so I set them aside while I waited.

I also mixed up the sauce and set it aside. It didn’t need to be cooked and was the easiest part of the recipe. Just measure three ingredients, add to a small bowl, and stir to mix.

Putting it All Together

I was ready to go when it came time to make the noodles thanks to the smell of the roasted garlic! Making the garlic mash was the next step, and it was as easy as it sounded. I squeezed both heads of roasted garlic into a mixing bowl and added the peeled clove of black garlic. Then I mixed in the leftover garlic oil and added a touch more from the bottle until I was happy with the texture.

Mashing orated garlic and black garlic with a fork
I made the garlic paste in a bowl instead of on my cutting board

Now I was ready to put it all together. I began by cooking the garlic mash for a few minutes in a large skillet. Then I added the noodles and sauce and mixed everything thoroughly with a pair of tongs so all the noodles were coated.

The recipe’s photo shows the noodles topped with sesame seeds, but they are not listed in the ingredients. I liked the look and happened to have some toasted sesame seeds on hand to add.

Tongs made mixing the noodles and garlic pasted easy

Timing

This recipe listed 45 minutes to prep, 5 minutes to cook, and a title time of 50 minutes. Here’s how my time was spent:

  • 3 minutes to prep garlic
  • 40 minutes to roast garlic
    • 11 minutes to prep remaining ingredients
    • 6 minutes to cook, drain, and rinse pasta
  • 5 minutes to make garlic mash
  • 11 minutes to cook garlic mash and noodles
  • 59 minutes total

I went a little over the time listed on the recipe, and it looks like that happened on the last step, cooking the noodles with the garlic mash and sauce. I took my time and made sure the sauce and garlic were thoroughly mixed into the noodles so I miss any of the garlicky goodness!

Pork Ribs with Black Garlic Miso Glaze

I never knew there was such a thing as black garlic until I saw the burger contest episode of Bob’s Burgers. If you haven’t seen it, Bob enters a contest at a food festival and is pitted against his nemesis Jimmy Pesto, and a celebrity chef. Bob begins making a black garlic burger only to discover his son Gene forgot to pack the black garlic. He can’t leave the contest, so he sends the kids to retrieve the black garlic, and hijinks ensue. Bob eventually gets the black garlic and finishes his burger, but comes in second. The silver lining is the celebrity chef and a crowd of contest audience members shows up at the restaurant to try this amazing burger. Well, black garlic has been on my list of things I want to try ever since then, and now I finally get to with this recipe for Pork Ribs with Black Garlic Miso Glaze!

These baby back ribs get the ultimate upgrade with a robust and complex glaze that includes black garlic, miso, and dried mushrooms.

Recipe Author: Jason Barwikowski at Food & Wine
Get the recipe

The Ingredients

As always, I started this off by looking through my kitchen for ingredients I already had. I was happy to find several of them. Things like fine sea salt, black pepper, water (of course), dry white wine, honey, sherry vinegar, and vegetable oil were all on hand.

My shopping list was short but it had a few things I couldn’t find locally. My regular grocery store had a 2.52-pound slab of ribs for $21.50. While I was there, I also found the shallots, thyme sprigs, and scallions.

Pork Ribs with Black Garlic Miso Glaze Ingredients
Baby back ribs, dry white wine, honey, vegetable oil, fine sea salt, black pepper, sherry vinegar, red miso paste, scallions, dried shiitake mushrooms, thyme sprigs, banana shallot, and black garlic

I hoped to find the red miso on the international aisle but no luck. I had to order it, along with the black garlic and dried shiitake mushrooms. The black garlic and shiitake mushrooms had leftovers, but the red miso was a little short. I ordered a 6-ounce package and recommend a larger size—at least 8 ounces should do it.

The Process

Making these Pork Ribs with Black Garlic Miso Glaze began with some simple prep work. First, I covered a sheet pan with foil. Next, I placed the slab of ribs on the sheet pan and covered both sides with salt and pepper before placing them in the refrigerator.

Ribs seasoned with salt and pepper

Cooking the Ribs

The next day, I let the ribs sit on my kitchen counter for an hour so they could come up to room temperature. I began preheating my oven about 15 minutes before that hour was up. That gave me plenty of time to prepare the roasting pan by adding water, wine, black garlic, shallot, mushrooms, and thyme.

I should mention that my grocery store did not have three small shallots. All they had was rather large banana shallots. The largest one was 3.5 ounces, and I used it whole and unpeeled. The recipe calls for 4.5 ounces, but I wasn’t sure if I should cut into another shallot to add that extra ounce.

I added the room-temperature ribs, covered them with a sheet of parchment, and covered the roasting pan with some foil. Then I added the ribs to the preheated oven for 2.5 hours. They looked rather blah when I removed them, but they were nice and tender.

Pork ribs after roasting int he oven
The slab of ribs after baking for 2.5 hours

Making the Sauce

Now it was time for the sauce while the ribs cooled. I began by fishing out the seasonings from the roasting pan and double-staining the liquid. I like using my regular (and larger) mesh sieve then the smaller fine mesh sieve. The first strainer removes larger bits that would clog the smaller one. I also added the liquid to a fat separator because it was faster than skimming off the fat.

Black Garlic Miso Glaze ingredients
Prepping the ingredients for the sauce

The sauce continued with adding sherry vinegar, honey, and red miso to my blender. This is where I discovered I didn’t buy quite enough. I looked up substitutes and found soy sauce was the most popular, but I decided to go with what I had and add soy sauce later if needed (it wasn’t).

By now the shallot and black garlic had cooled enough to handle, so I peeled them and threw them into the blender too. The fat had risen to the top of the reserved liquid so I poured that into the blender with everything else and blended it all. I ended up with 3.5 cups of blended liquid. Finally, the blended mixture went into a 2-quart pan to simmer and thicken while I finished the ribs.

Cut apart slab of ribs
There were 12 ribs in the slab

Finishing the Ribs & Sauce

The slab of ribs had cooled, so I sliced it into individual ribs. The next step was to fry them in a cast iron pan. I used my 12-inch pan since it had the most room, but I misunderstood the instructions.

I thought it said to fry two at a time, but now I realize it was two batches That would have been 6 ribs per batch, though, and I’m not sure my pan would have held that many. At any rate, I put them in 2-3 at a time.

Golden brown fried spareribs
After frying the ribs until golden brown

The sauce was simmering away while I fried the ribs. It wasn’t as thick as I would have liked after 15 minutes, so I let it keep simmering until it got to a consistency I liked. It was nice and thick by the time the ribs were ready to be plated and sauced.

Timing

This recipe listed lists active time and chilling time instead of prep and cooking like I’m used to. It also lists a total time of 16 hours 40 minutes, so I’ll use that for the time rating. Here’s how my time was spent:

  • 5 minutes to season ribs
  • 12 hours to chill
  • 1 hour to rest
  • 5 minutes to prep ribs and herbs
  • 2 hours 30 minutes to roast ribs in oven
  • 30 minutes to cool ribs
    • 6 minutes to prep sauce (done while ribs cooled)
  • 37 minutes to fry ribs and simmer sauce
  • 16 hours 47 minutes total

Broken down in more familiar time listings it would be:

  • Prep 10 minutes
  • Cook 3 hours 7 minutes
  • Cool 30 minutes
  • Rest 1 hour
  • Chill 12 hours
  • 16 hours 47 minutes total

I surprised myself by not going way over the time listed thanks to my little misunderstanding of how many ribs to fry at a time. Yay!

Sake Sangria

Not long ago I ran across this Sake Sangria recipe and knew I had to make it! I had some leftover sake from the Korean Skirt Steak with Kimchi Aioli I made recently. It only used a tablespoon of a brand-new bottle. Now I had an almost full bottle and nothing to do with it. Well, nothing special. So why not add some fresh fruit and turn it into Sake Sangria?

A delightful twist on the classic Spanish punch, Sake Sangria combines the delicate flavors of Japanese sake with fresh fruits and a touch of sweetness. A refreshing and light alternative to its wine-based counterpart, this cocktail is perfect for social gatherings and offers a unique fusion of East and West.

Recipe Author: CocktailFlavors.com
Get the recipe

The Ingredients

As I mentioned, I already had a bottle of sake that had barely been touched. It was even one of the preferred brands mentioned in the blog post, Gekkeikan. My liquor cabinet also had a bottle of Gan Gala orange liqueur. I have found it’s not quite as good as Grand Marnier when served on its own, but it’s comparable when used in mixed drinks.

After a little rooting around in my refrigerator found simple syrup and a can of seltzer water. That left only the fresh fruit and optional mint to purchase. I chose cara cara oranges, blackberries, and raspberries.

Sake Sangria Ingredients
Soda water, simple syrup, sake, blackberries, raspberries, cara cara orange, orange liqueur, and mint

The Process

The fruit, simple syrup, and liquors needed to be infused for a minimum of two hours, so this recipe had to be made the day before I planned to serve it. The prep work wasn’t difficult at all!

To get things rolling, I added sake, orange liqueur, and simple syrup to a large pitcher. Next, I sliced an unpeeled cara cara orange in half, and then into thin slices. After that, I measured the orange slices with some blackberries and raspberries for a total of two cups.

Lightly muddled raspberries and blackberries
I lightly muddled the berries before adding them to the pitcher to infuse overnight with the oranges

I noticed slicing the oranges gave them lots of surface area to help infuse their flavor into the liquid. The berries didn’t have that, so I very lightly muddled them in a mixing glass to release some juices before adding them to the pitcher.

The next day, I had to strain out the fruit before serving. I did it in two stages since my fine cocktail strainer is quite small and designed for making a single cocktail. I emptied the bulk of the fruit into a mesh sieve placed over my largest measuring cup (4 cups/32 ounces). There were still some tiny seeds and other solids clouding my sake sangria, so I placed my finer strainer over the opening of the pitcher and strained the sangria back into the pitcher.

Strained sake sangria
After straining there was just shy of 4 cups of liquid

Serving

The recipe says this drink can be served over ice in a wine glass or tumbler. I chose a tall, thin tumbler and added ice, sake sangria, and soda water. I immediately noticed the color was significantly more translucent than the recipe’s photos.

Now, the instructions do say to mix the soda water with the sake sangria in the pitcher, but I added it to the glass to create a gradient. A big part of the appeal of this recipe was the sunset-like fade from clear to yellow to red.

Sake Sangria in a highball glass

Next, I switched to a larger stemless wine glass thinking more sake sangria would deepen the red color and create the gradient I was looking for. Unfortunately, I got a similar see-through pink look in it as well.

Then I had an idea! I added a few raspberries to a new glass and lightly muddled them. Then I made the drink on top of them by adding ice cubes, sake sangria, and soda water. This version was closer to the recipe photos and faded from clear to red. No yellow, but it was pretty.

Timing

This recipe listed 10 minutes to prep/total. However, the instructions list a range of 2 hours to overnight for the fruit flavors to infuse the sake mixture. Here’s how my time was spent:

  • 5 minutes to prep
  • 12 hours to infuse
  • 2 minutes to strain
  • 2 minutes to pour and garnish
  • 12 hours 9 minutes total

Korean Skirt Steak with Kimchi Aioli

I’ve been loving the last few Asian-themed recipes, and I can’t quite get the cuisine out of my head. I don’t want to get in a rut of similar flavors though because that would get boring real fast! That made adding the Korean Skirt Steak with Kimchi Aioli recipe to my blog an easy decision. Skirt steak is very different from ramen, soy sauce eggs, and salmon, so I do not feel like this theme is getting old, and I hope you’re not either! This recipe promises a savory cut of beef with zesty aioli-style sauce. It looks and sounds wonderful, and I’m here for it!

This Korean Skirt Steak with Kimchi Aioli is definitely worth a try! If you don’t have a grill pan then let this be the reason you invest in one. There is something about those grill marks that just makes steak so much better.

Recipe Author: Fiya Fong at Feeding the Fiya
Get the recipe

The Ingredients

My whole pre-shopping kitchen look-see turned up a few things. I had soy sauce, rice vinegar, toasted sesame oil, sugar, sesame seeds, rice, and dried chili powder. I chose Korean gochugaru since I had it on hand and it fit the theme best.

There were a few other ingredients, but not enough of them for this recipe. That left me with a fairly short shopping list, and I found almost everything at my usual grocery store.

The only thing they didn’t have was sake, and that surprised me. I had to run to the liquor store to get it. I would have had leftovers from my last post, Japanese-style risotto with Seared Salmon, but I managed to spill it while I took photos.

Korean Skirt Steak with Kimchi Aioli Ingredients
Skirt steak, ginger, sugar, gochugaru, mayonnaise, soy sauce, sesame seeds, kimchi, scallions, toasted sesame oil, sake, rice vinegar, jasmine rice, and garlic

The Process

This recipe was divided into three main parts: steak, aioli, and serving. It also has the option of being made in one day or over two days. I chose the latter since it had the longest marinating time for the steak.

If you aren’t familiar with skirt steak, I highly recommend reading the linked articles in this recipe’s notes. They both have lots of tips and photos demonstrating the techniques of trimming skirt steak and cutting meat against the grain.

The Marinade

The skirt steak needed to marinate for 4 to 24 hours, so I chose the latter and began this recipe the day before cooking and serving it. That meant I had to start with the skirt steak and marinade. My skirt steak was trimmed and didn’t have any excess fat to be removed, so I went straight to the marinade.

Making the marinade was super easy! The recipe says to mince the garlic, ginger, and scallions before adding them to the other ingredients. I veered from that slightly and chose to press the garlic and grate the ginger because I find it easier than mincing with a knife.

After that, I added everything to a large sealed container and gave it a mix. Lastly, I cut the skirt steak into strips about as long as the container. I made sure to coat each side of the pieces as I added them, then put the lid on and popped it into the fridge.

Marinating the skirt steak

The Kimchi Aioli

Since sitting in the refrigerator allows flavors to meld and develop, I chose to make the aioli right after the marinade was taken care of. This step was even easier than the marinade! All that was needed was to add all the ingredients to my food processor, press a button, and let everything blend for about 90 seconds.

I briefly considered using my mini-prep but opted for my full-size food processor because I wasn’t sure if the mini-prep would hold everything. It turns out that this recipe made 10 ounces (1 1/4 cup) of aioli, so the mini-prep probably would have worked.

Everything looked good when I was done, but there was a minor issue with the aioli the next day. It didn’t look separated, but I gave it a stir anyway and found the consistency to be thin but a little grainy. This time I used one of the bullets that came with my blender. It took care of the bits of kimchi and gave the aioli a smooth consistency.

Tip: I used a squeeze bottle to mimic the aioli in the recipe’s photos. If you don’t have a squeeze bottle, you can use a piping bag or add the aioli to a ziplock bag and trim a tiny bit of the corner, essentially turning it into a piping bag. Or you could skip all of that and drizzle it with a spoon because the consistency was very thin.

Making the Kimchi aioli

Cooking & Serving

The cooking part of this recipe was very simple. The steak called for my trusty grill pan, so I added some oil and let it preheat to medium-high.

While that was happening, I prepped the skirt steak. First, I rinsed the skirt steak to remove the clumps of ginger, garlic, and scallion. Then I made sure to pat both sides thoroughly dry with paper towels.

Rinsing removed the marinade’s solids so they didn’t burn and turn bitter during cooking at high heat. Drying the steaks afterward helped ensure a good sear during cooking. And trust me, removing the solids did not remove the marinade’s flavor! The steak soaked it up and had a strong ginger-garlic flavor.

Speaking of cooking, I chose to cook mine for 2 minutes per side for a medium-rare. Closer to rare, even though my steaks were 1/2 inch thick at most. The cooking times listed on the recipe say they apply to steaks that are 1 inch thick, so I’m guessing my pan wasn’t as hot as it could have been (I set it at 7 out of 10 on an electric stove).

I had toasted the sesame seeds the day before, so there wasn’t much left to do while the steaks rested. Just slicing the scallions, reheating the rice, and spooning some onto a plate. Once the steak had rested, I sliced it thickly against the grain and placed it on the rice. A dash of gochugaru, a drizzle of kimchi aioli, and a few scallions were the final step. (I forgot the toasted sesame seeds for the photos but I did add them before serving.)

Korean Skirt Steak with Kimchi Aioli

Timing

This recipe listed 5 minutes to prep, 20 minutes to cook, 4 to 24 hours to marinate, for a total time range of 4 hours 25 minutes to 24 hours 25 minutes total. Here’s how my time was spent:

  • 9 minutes to make marinade
  • 24 hours to marinate
  • 6 minutes to make aioli
  • 9 minutes to toast sesame seeds
  • 8 minutes to cook steak
  • 10 minutes to rest
  • 3 minutes to slice, plate, and garnish
  • 24 hours 45 minutes total

I went over everything but the marinating time. I’m not sure where the slowdown was, so I think it’s likely spread throughout the whole process.

Japanese Style Risotto with Seared Salmon

A couple of weeks ago I stumbled on a deal while I was doing my grocery shopping. Fresh Market has a whole salmon fillet on sale for $25. I wasn’t planning on making salmon and debated on buying it. I couldn’t pass up a deal like that bought a giant salmon fillet with no idea what I would make with it. I cut it up and froze the pieces as soon as I got home, then it was off to Pinterest to search for recipes. I decided on this Japanese Style Risotto with Seared Salmon recipe. The Japanese-Italian Fusion sounded intriguing and fit with my East Asian theme of late.

Savory, delicious and super flavorful. Soy glazed salmon piled over miso-flavored risotto packed with shiitake mushrooms. Made with simple ingredients and ready in about 40 minutes. A perfect dish to transform your dinner into a next-level flavor bomb!

Recipe Author: Anna Chwistek at Serving Dumplings
Get the recipe

The Ingredients

I read the recipe in advance and knew I wouldn’t find white miso paste at my usual grocery store, so I added some to an Amazon order. What I didn’t realize was it was regular miso paste, not white miso. Luckily, I noticed before I shopped for the other ingredients and was able to order the correct type of miso paste in time.

When it came time to try this recipe, I set a couple of the frozen salmon fillets in the refrigerator to thaw overnight. Then I did my pre-shopping ingredient check. I had a few things like olive oil, low-sodium soy sauce, garlic, sake, chicken broth concentrate, and unsalted butter. I found everything else at my usual grocery store.

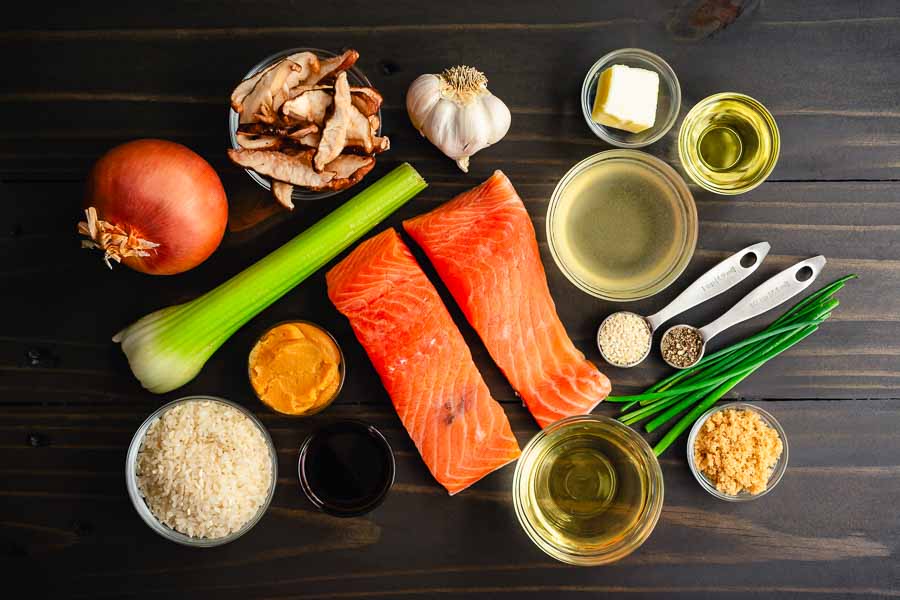
Japanese Style Risotto with Seared Salmon Ingredients
Salmon fillets, unsalted butter, olive oil, chicken broth, sugar, black pepper, chives, sesame seeds, sake, low-sodium soy sauce, sushi rice, white miso paste, celery, brown onion, shiitake mushrooms, and garlic

The Process

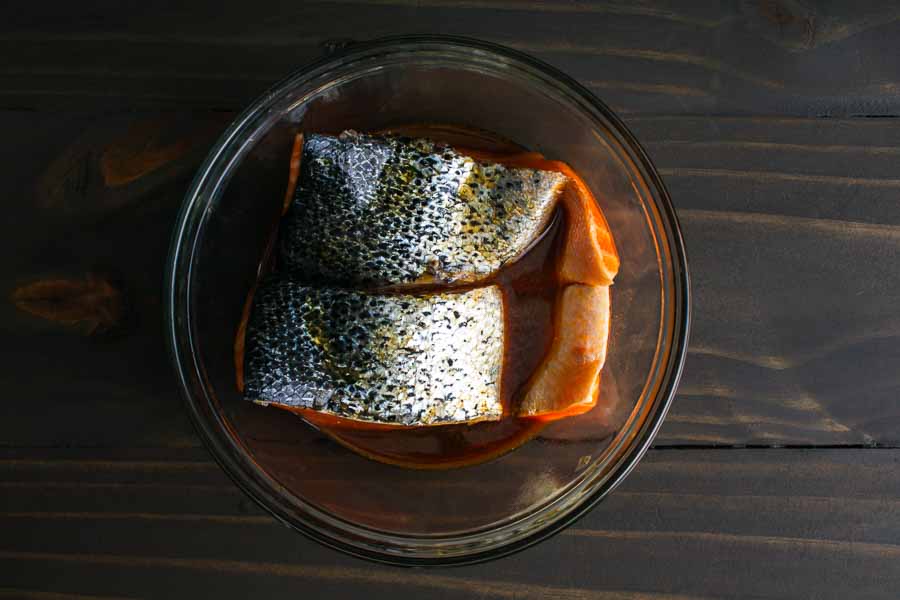
This recipe begins with making the marinade for the salmon. It mixes up quickly, and I was adding the fish fillets in no time. I made sure to place the fillets skin side up so the meat could absorb the flavor better. Also, the recipe doesn’t specify, but I marinated my salmon in the refrigerator to be safe.

Tip: Fish gets mushy if marinated for too long. Some sources say salmon can marinate as long as 60 minutes, but I find 20-30 minutes is safest. This is especially true if there are any acidic ingredients in the marinade, like citrus juice, wine, or soy sauce.

Marinating salmon fillets
Marinating the salmon fillets with the skin side up so the meat could absorb the flavors better

Making the Risotto

Once the salmon was marinating, I moved on to the risotto. I bought sliced shiitake mushrooms, so I didn’t worry about tearing them all. Instead, I tore the largest slices into smaller pieces so they were all more evenly sized.

Next, the mushrooms needed to be browned. The pan used for this would ultimately be used to make the risotto. I chose a deep saute pan because risotto needs a lot of stirring. The high sides keep things neater.

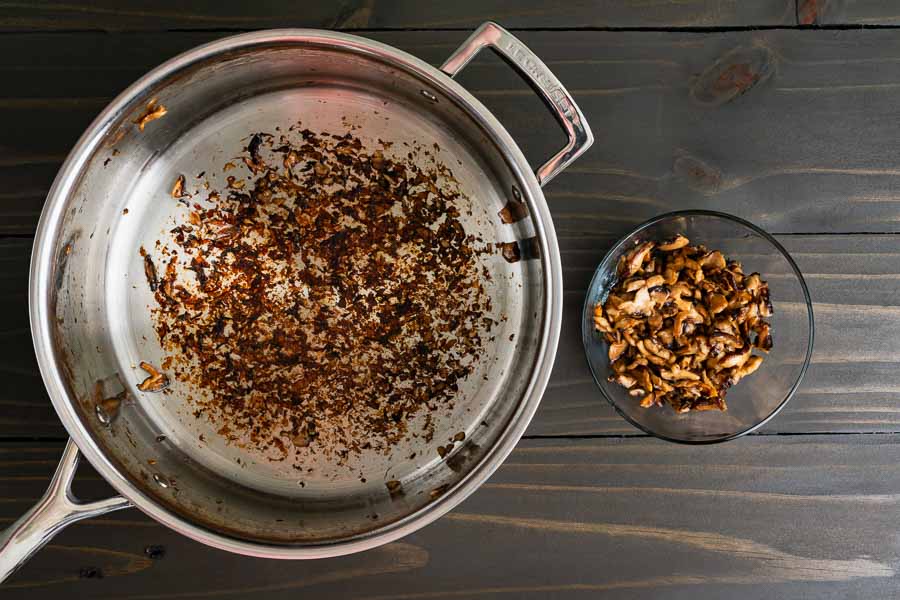
Browning the mushrooms took about 10 minutes, and left a lot of brown bits stuck to the bottom of the pan. It might look awful, but those brown bits add flavor. They all came up in the next step when I deglazed the pan with sake and a wooden spatula (it works better than a spoon).

Browned mushroom bits on saute pan
The mushrooms left a lot of browned bits in the bottom of the pan, but they came up easily when I deglazed the pan

I was soon ladling chicken broth into the pan with the toasted rice and sauteed vegetables. This part took patience! After the second round of ladling in broth, I started tasting bits of rice for doneness. It took a few more before they lost most of their crunch.

The instructions say this part will take about 15 minutes, but it took me a little longer. Okay, a lot longer! I eventually realized I set the heat too low and raised it from 2 to 4 to speed things along.

Otherwise, things went according to the recipe. I set my risotto aside and began the fish next. The texture was a little drier when I served it and not quite as creamy as I would have liked. A touch more broth would fix that.

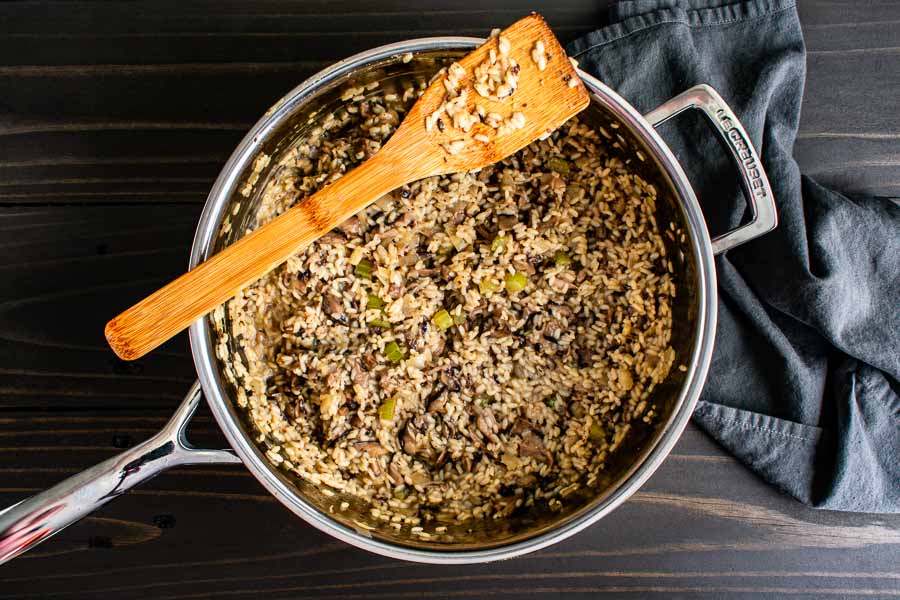
Risotto in a saute pan with a wooden spatula
I used a wooden spatula to deglaze the pan and stir the risotto

Cooking the Salmon

Once the risotto was complete, I got started on the marinated salmon. This step was simple. I preheated a 10-inch non-stick skillet with oil. Butter has a low smoke point, so I only added it right before the fish.

Tip: Pat both sides of the salmon dry with paper towels before adding to the pan to ensure it develops a nice crust on the outside. Also, cook the meat side first, then flip so the skin side is down. Removing the fillets from the pan for serving is easier with the skin side facing down.

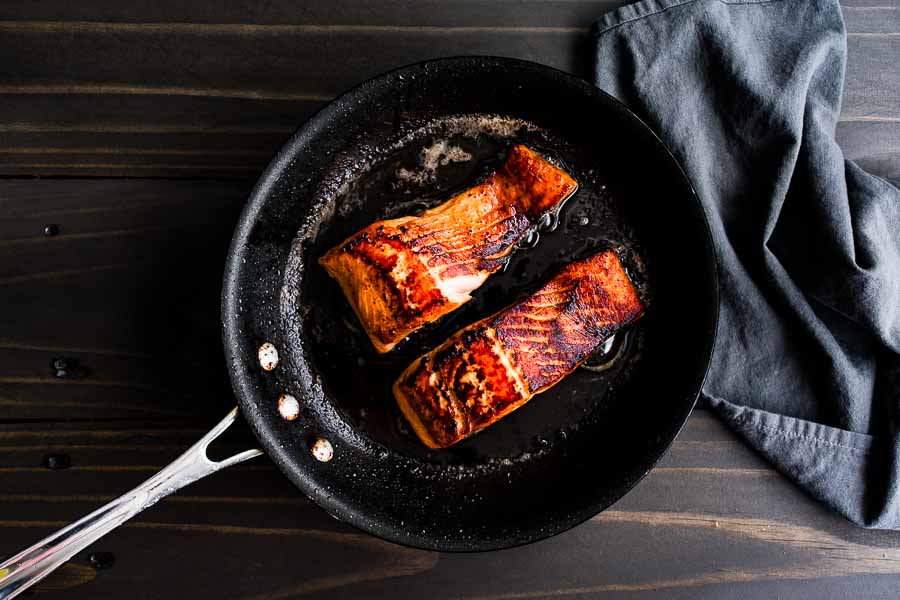
Four minutes per side was just right and gave my salmon a slight crunch outside and cooked it to medium. There was a slight bit of pink in the middle—not as well done pink, that is)—I’m sure because I didn’t allow it to come to room temperature before cooking.

Seared salmon fillets in a non-stick skillet
I seared the salmon fillets in a 10-inch non-stick skillet

Timing

This recipe listed 10 minutes to prep, 30 minutes to cook, and a title time of 40 minutes. Here’s how my time was spent:

  • 3 minutes to prep the marinade
  • 40 minutes to cook the risotto
  • 8 minutes to cook the salmon
  • 51 minutes total

The slow-down was while making the risotto. I had the heat set too low, and it took ages to stir in the broth. I have to admit I use packaged risotto when I occasionally make it, and it has spoiled me. It’s been years since I have made it from scratch!